
Free DIY Passport Wallet Pattern

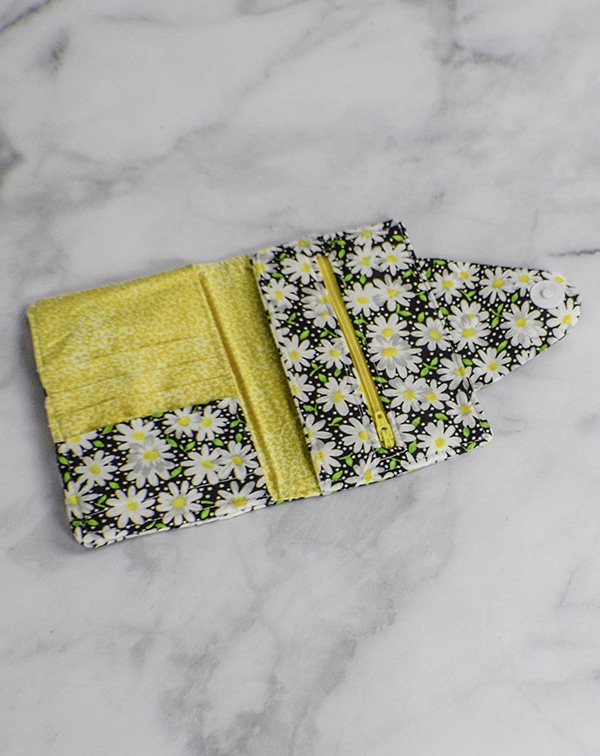
I am taking my first ever vacation with my husband alone to Ireland and decided to create this easy to make and free DIY passport wallet pattern to carry both of my passports, my identification and credit cards as well as my phone and money all in one place. It was amazing just how easy this travel wallet pattern came together and how little time it took to make. I hope that you will think the same and give this travel-passport wallet a try.
*This post contains affiliate links that if you click on them and make a purchase I will receive a small commission at no extra cost to you.* As an Amazon Associate I earn from qualifying purchases.
What you will Need:
- Pattern
- 1/4 yd. outer fabric
- 1/4 yd. interior fabric
- 1/2 yd of Pellon 808
 interfacing
 - 1/2″ swivel clip
- 1 magnetic snap
- 1 3/4″ Piece of 1/2″ elastic
Step 1: Free DIY Passport Wallet Pattern
Cut Pattern pieces as follows:
- 2 Pieces 2 1/2″ x 9″ of outer fabric and 1 piece of interfacing using either Pellon SF101 or 808 depending on how stiff you want your wallet to be. I used SF 101 for all Pieces but the large backing pieces.
- 2 Pieces 3″ x 9″ of lining fabric and 1 piece of interfacing
- 2 Pieces 3 1/2″ x 9″ of lining fabric and 1 piece of interfacing
- 2 Pieces 4″ x 9″ of lining fabric and 1 piece of interfacing
- 2 Pieces 5″ x 9″ of lining fabric and 1 piece of interfacing
- 2 Pieces 4 7/8″ x 5 1/2″ of outer fabric and 1 piece of interfacing
- 2 Pieces 9 1/8″ x 9″ and 1 piece of interfacing. 1 Piece of outer fabric and 1 piece of lining fabric. I used Pellon 808 for this piece.
- 1 Piece of 2″ x 14″ for strap and 1 piece of interfacing
- 2 of each of the pattern Pieces
Step 2: Free DIY Passport Wallet Pattern
All seam allowances are 1/4″. Interface one side of the ticket pocket by fusing the Pellon 808 according to the package directions. If you have never used interfacing just cut out the piece and lay the wrong side of your fabric onto the glue side of your interfacing and press with a hot iron. This will fuse the pieces together and give your wallet more structure. . Fold the piece of elastic and baste it to the side of the ticket pocket to be used as a pen holder with the fold facing inwards. Place the two pocket pieces right sides together and sew around the top curve to the bottom edge leaving the bottom and ling side open. Turn right sides together and press. Top stitch around seam. Set aside.

Step 3: Free DIY Passport Wallet Pattern
Interface the 5″ x 9″ Piece and sew the two pieces right sides together along 1 long edge. Turn right sides out and press. Top stitch the seam.

Step 4: Free DIY Passport Wallet Pattern
Sew the top and side of the 4 7/8″ x 5 1/2″ piece right side together. Turn right side out and press and top stitch as you did the other pieces. Sew this piece to the ticket pocket on the side following your previous stitching. Baste the pieces to the 5″ x 9″ piece you previously prepared and baste along raw edge.


Step 5: Free DIY Passport Wallet Pattern
Next, sew your card pockets. These include:
- 2 Pieces 2 1/2″ x 9″ of outer fabric and 1 piece of interfacing using either Pellon SF101 or 808 depending on how stiff you want your wallet to be. I used SF 101 for all Pieces but the large backing pieces.
- 2 Pieces 3″ x 9″ of lining fabric and 1 piece of interfacing
- 2 Pieces 3 1/2″ x 9″ of lining fabric and 1 piece of interfacing
- 2 Pieces 4″ x 9″ of lining fabric and 1 piece of interfacing
Each is made the same way. Interface each with SF101 or the interfacing of your choice and sew the two pieces right sides together along one long edge only. Turn right side out and top stitch along the seam. Once all of the pieces are finished. Stack the pieces on top of each other. Fold in half to find the center and mark. Top stitch through all layers 1/4″ on each side of the center line. This will hold the card pockets together.

Step 6: Free DIY Passport Wallet Pattern
Interface the interior piece measuring 9 1/8″ x 9″. Place the card pockets on the right side of the piece so that the 9″ sides line up with the card pockets and baste along the edge.
Step 7: Free DIY Passport Wallet Pattern
Place the Passport Pocket layers on the left side of the interior piece and baste.
Step 8: Free DIY Passport Wallet Pattern
Create the strap and the swivel clip holder by folding the 2″ x 14″ piece in fours so that the raw edges are embedded inside the folds. Top stitch along both sides. Cut 1″ from the strap and fold it in half placing the swivel clip inside and baste to the interior piece between the ticket pocket stack and the card pockets.


Step 9: Free DIY Passport Wallet Pattern
Create the Tab closure. I interfaced this with Pellon 808. Sew the piece right sides together. Turn right side out and press. Top stitch around the curve leaving the bottom open. Add the male portion of the magnetic snap to the top part of the curve on the interfaced side. Make sure that the prongs are on the inside and hidden.

Step 10: Free DIY Passport Wallet Pattern
Center the tab closure on the right side of the piece with the card slots and baste.

Step 11: Free DIY Passport Wallet Pattern
Place the Outer 9 1/8″ x 9″ right side over the right side of the passport holder and clip. I used wonder clips![]() for this process as it was easier than pinning. Using a 1/4″ seam allowance, stitch around the perimeter of the piece leaving an opening at the bottom for turning.
for this process as it was easier than pinning. Using a 1/4″ seam allowance, stitch around the perimeter of the piece leaving an opening at the bottom for turning.

Step 12: Free DIY Passport Wallet Pattern
Using the tab closure as a guide place the female half of the magnetic snap onto the front of the wallet so that the snap halves meet.

Step 13: Free DIY Passport Wallet Pattern
Sew the opening closed using ladder stitch then top stitch around the entire perimeter of the wallet. You have now completed your passport travel wallet.

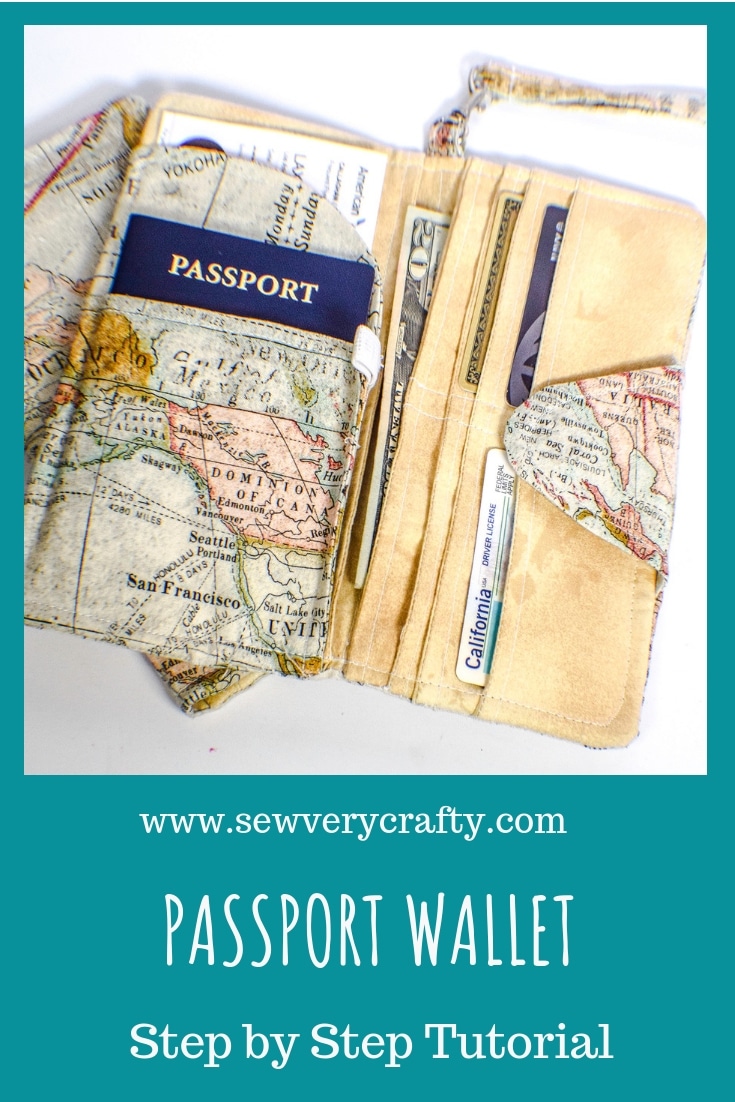
I hope you like this free passport holder pattern and tutorial. You can fit two passports in this travel passport cover along with money and cards. Sewing this passport holder wallet requires only experienced beginner sewing skills so most everyone can complete this project in no time at all.
If you would like more sewing and crafting projects sign up for our newsletter and receive your free eBook containing 15 handbag patterns and tutorials.

Thanks for the link to the World Map fabric, very helpful. Can you please tell me what the internal fabric is too? It looks really stained or something, I just love it! Thanks!
I do not recall the fabric name. It was a remnant that I got at Joann and it does have a patchy stained look. I wish I could be of more help.
Hello
Thanks for making this available! I’m trying to make one for my wife, but I’m having trouble with some of the instructions. It states ‘Interface one side of the ticket pocket by fusing the Pellon 808 according to the package directions.’ What are the dimensions of the ticket pocket? It doesn’t reference it in the cutting pattern 🙂
Best,
Sam
Thank you for contacting me. The ticket pocket is part of the downloadable pattern pieces. Just click on the link and download the pieces and you will see it. Please feel free to let me know if you have any other questions.
Thanks very much! If I print on A4, will the pattern be the correct size?
I believe so as A4 is just a larger piece of paper.
Thanks very much for your help.
You are welcome.
What a fabulous idea! I absolutely LOVE your fabric and your tutorial is full of detail.
I can hardly wait to make one. Thank you so much for posting. It is so awesome I have included your link in my 10 Awesome Travel Accessories to Sew post. You can check it out here! https://whatsnanamaking.com/travel-accessories-to-sew/
Thank you. I love it too. I use it every time I travel.
Hi I’m interested in making this but the linked pattern is only one page, the tab closure and the ticket pocket, please help as having looked at a few pass port holders I like yours the best
The rest of the pattern is just rectangles that are described in the tutorial. You do not need any more pattern pieces.